¶ Installation Overview
Setting up the Robin Home system is quick and simple. It consists of only four steps:

¶ Setting up the Robin Home hub
Everything you need to do to physically set the hub up for the installation process.
¶ Prepare the hub
Before we can set the hub up we need to unscrew the four screws that hold the outer case in place. There are two screws on the top and bottom. Unscrew and completely remove the two screw on the top. Then unscrew the two screws on the bottom, these are captive screws so you do not need to fully remove them. Now pull the outer plastic case apart to access the to panel itself.
¶ Ethernet
The first step in setting up the Robin Home hub is simply plugging the Ethernet cable into the plug labeled Ethernet on the backside of the hub. Ensure that you plug the other end of the Ethernet cable into a router or switch so that the hub can connect to the network on site.
¶ Power
The second step is plugging the power cable into the port labeled DC 9V on the backside of the hub. Finally, push the switch labeled Battery into the on position.
Once powered on you will see the light on the front of the hub come on. Check to ensure the lights on the Ethernet port are also on. Now the hub is physically installed and ready to be programmed.
Now that the hub is powered on and connected to a network, you will use the web management interface (WMI) to set up the account, devices, reporting, settings, and users.
¶ Configure The system
Everything you need to do to configure the Robin Home system.
¶ WMI
The Web Management Interface is what we use to configure everything in the system. Visit wmi.robinsystems.co.nz and log in using your email address and password.
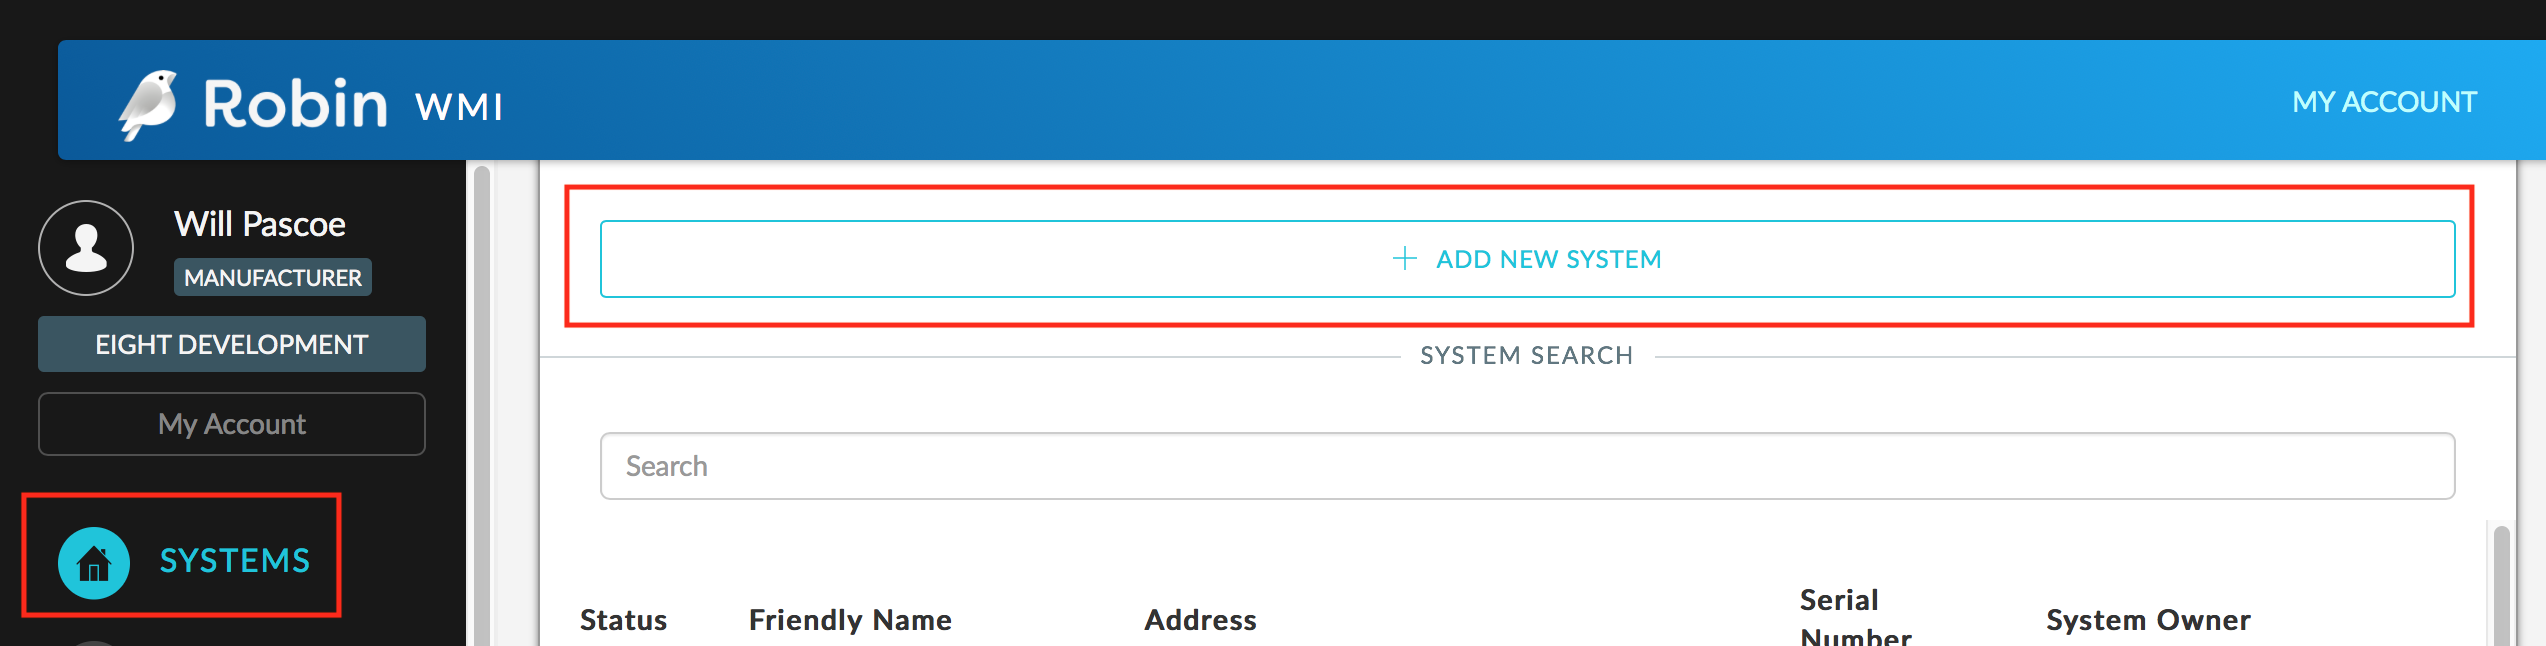
¶ Add the System
Once logged in to the WMI, click Systems from the left side menu, then click + Add New System.
This will bring up a window to input the serial number on the hub.
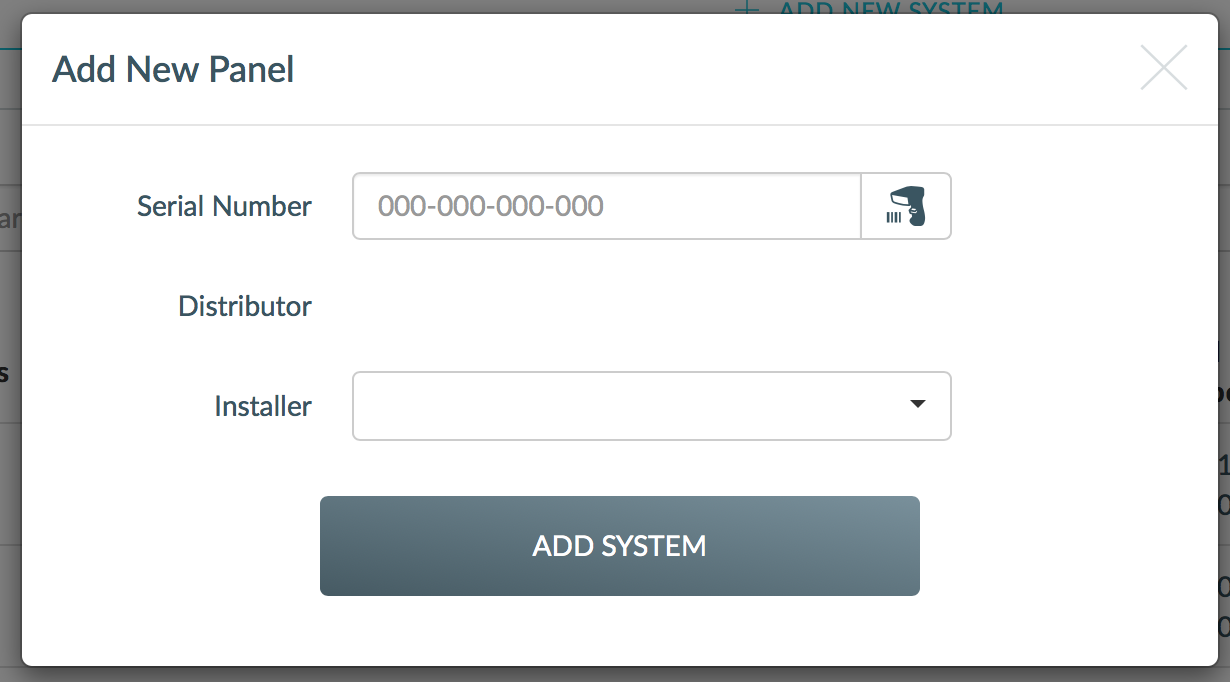
Scan or type the serial number in the serial number field, then choose your company from the installer drop-down box. Once this is complete you will see the panel is added to your list of systems. It will show as Unconfigured Panel and the last 3 digits of the serial number.
Select the panel from the list and you will see the following page:
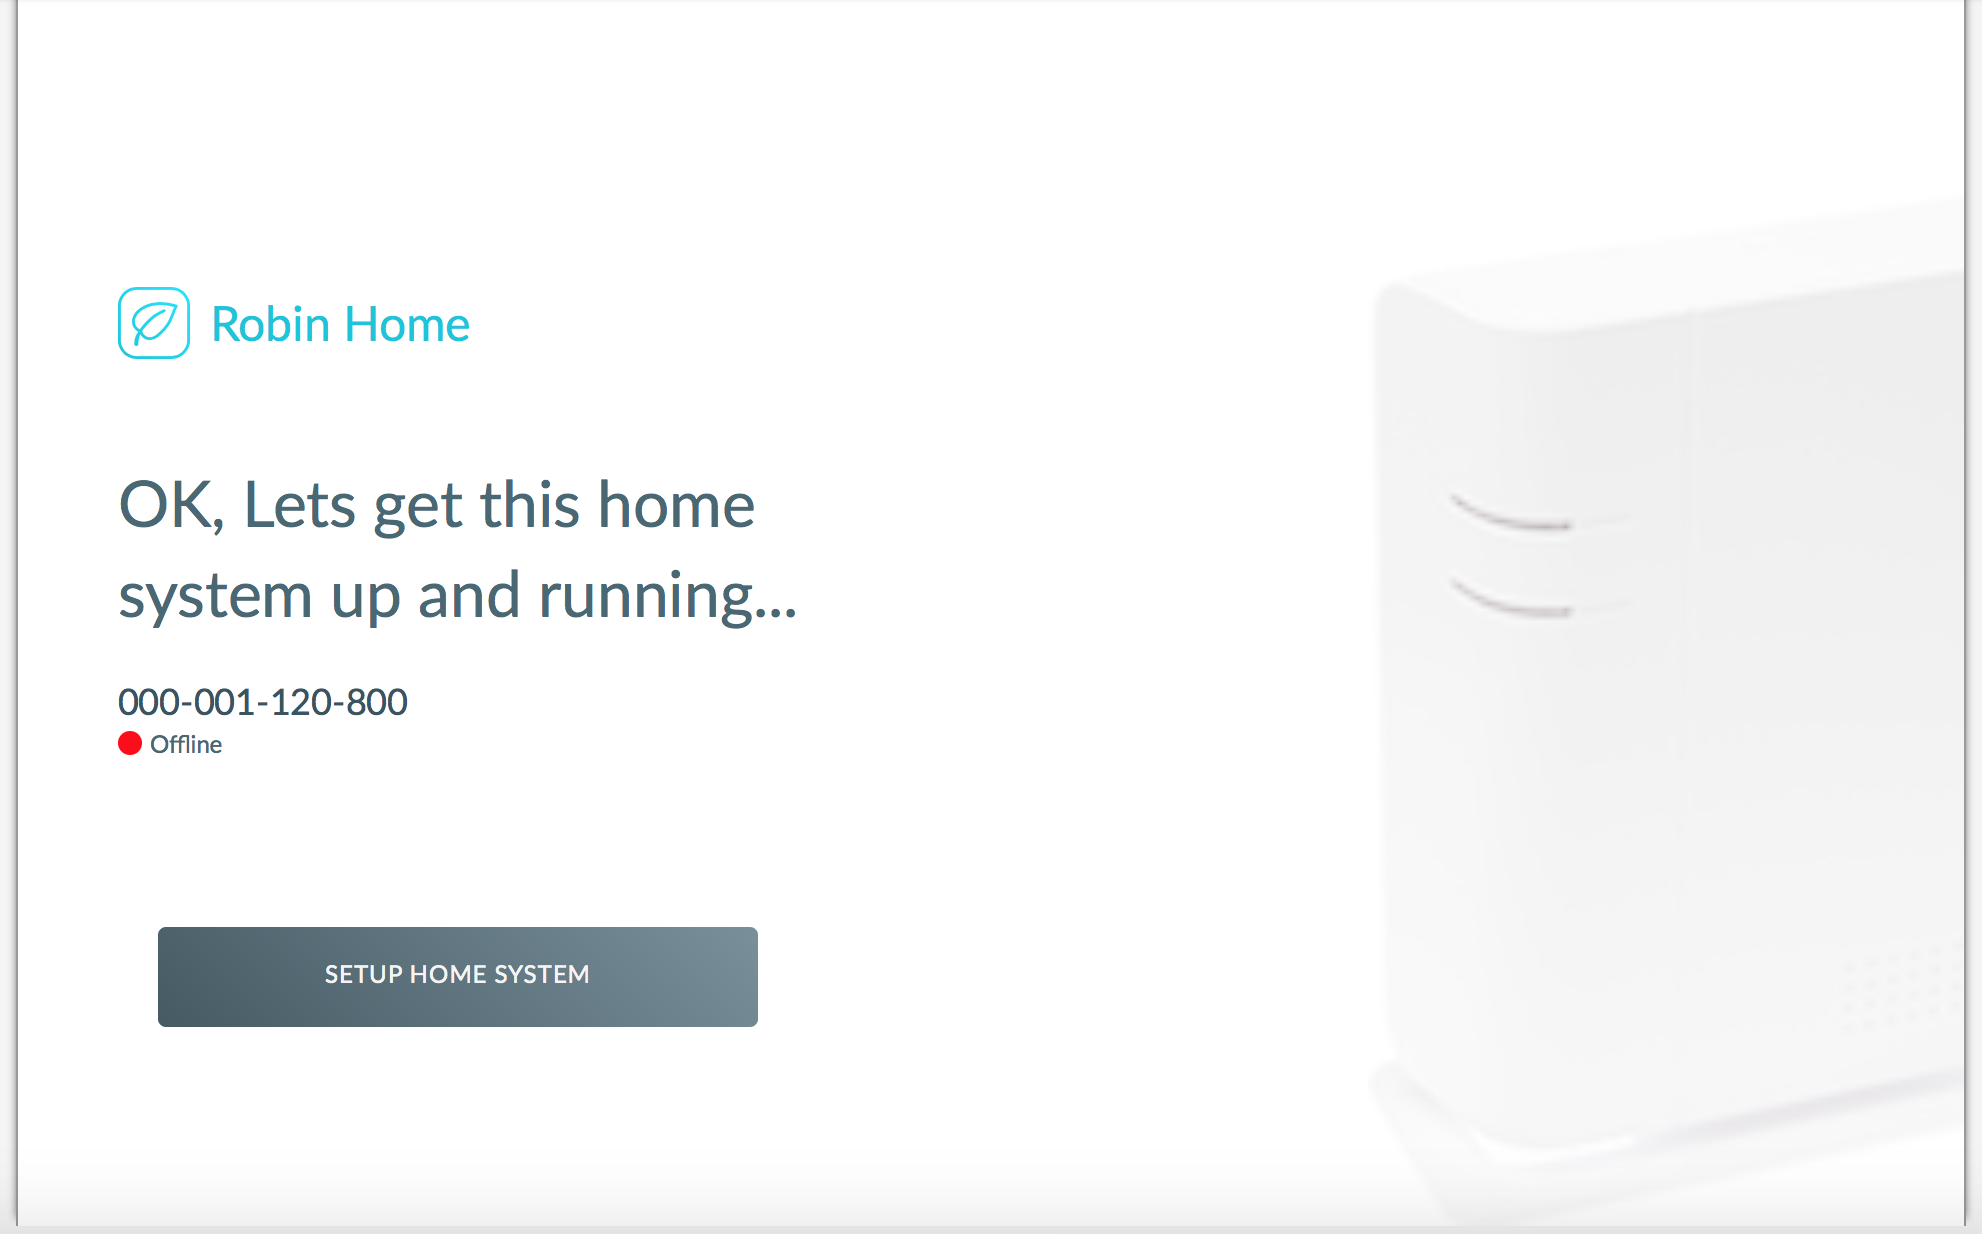
Confirm the serial number is correct before proceeding.
Click Setup Home System, this will take us to the next section, Account.
¶ Configure Account
The account section covers the master user's details.
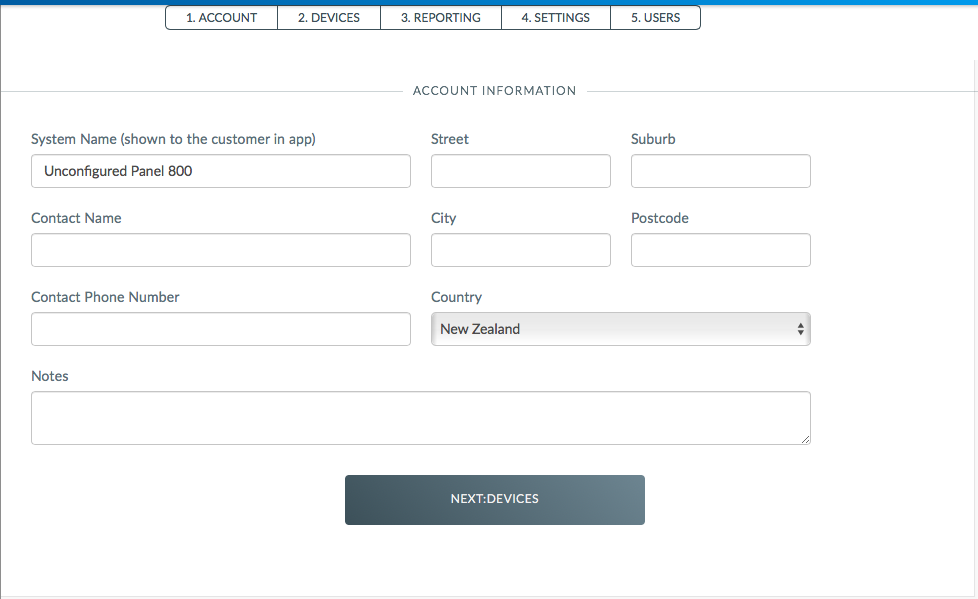
System Name - this is what will show in the systems list, as well as what will be shown in the app. Give it a unique name so if the user has more than one panel, they can easily see which system they are controlling.
Contact Name - Put the name of the master user in this field.
Contact Phone Number - Put the phone number of the master user in this field.
The remaining details are for the address of the site. Enter these details and click Next:Devices.
¶ Configure Devices
For a full list of devices visit the accessories page.
The devices section is where you will add all of the devices that will be connected to the Robin Home system. Devices such as PIR's, keyfob's, smoke alarms, etc.
It is recommended that you pair all of the devices before physically installing them in their permanent locations.
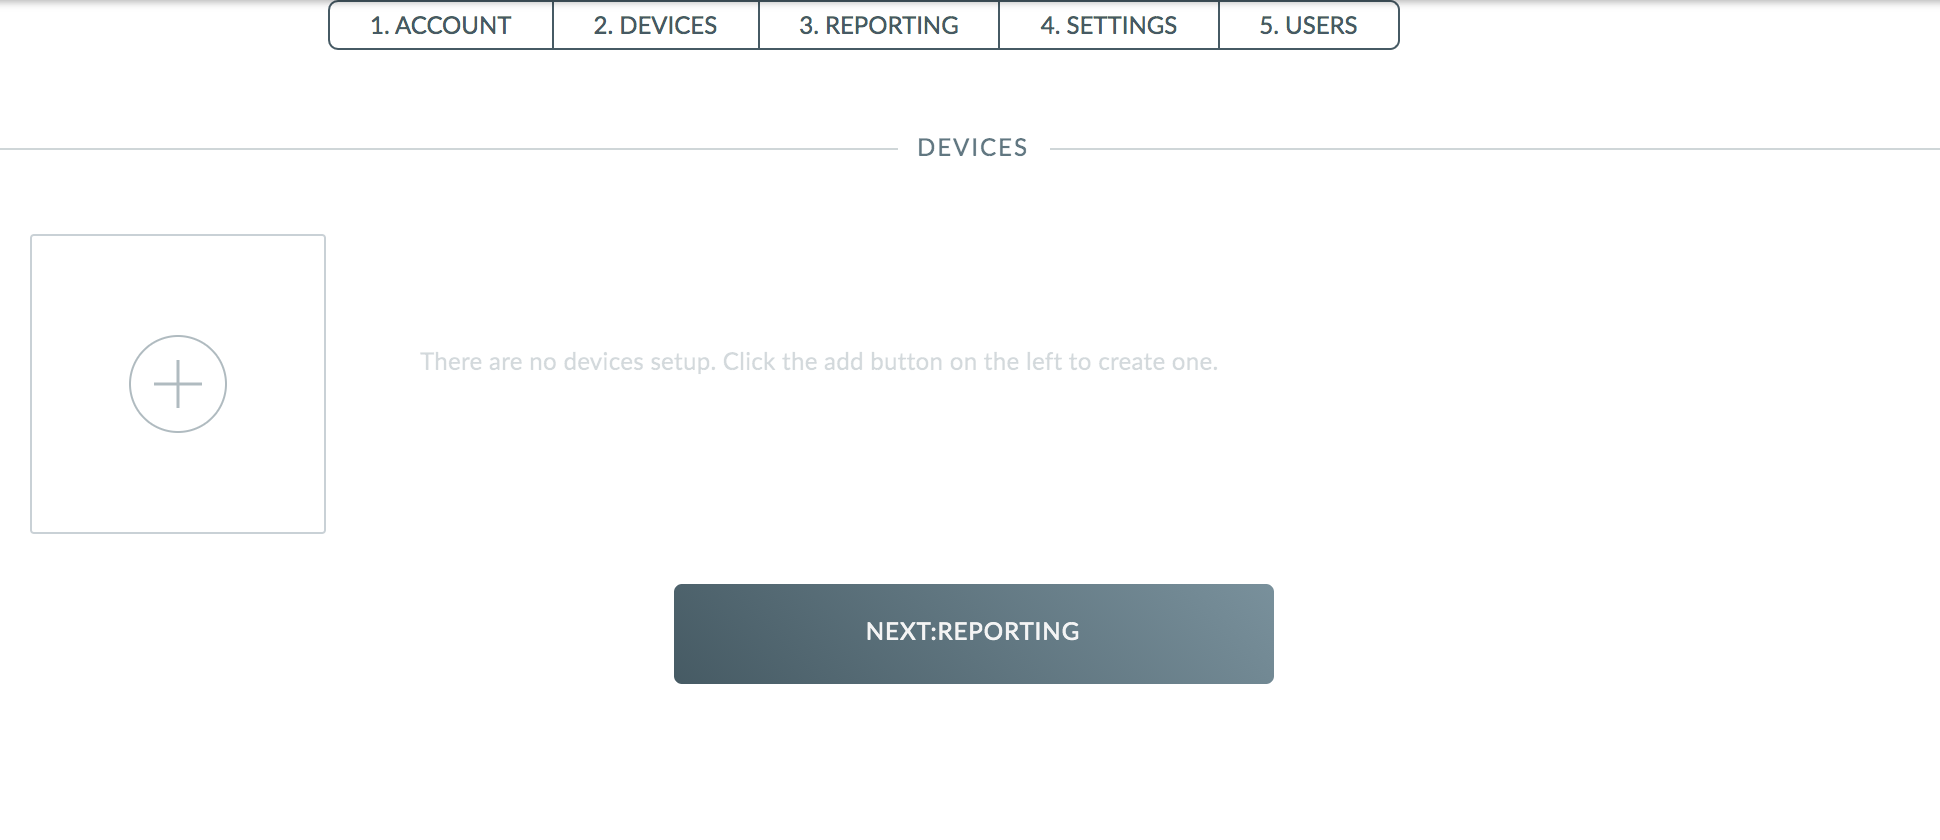
Click the Add button to bring up the add devices page

Select the type of device you are trying to pair with the hub, then follow the instructions in the box of that specific device to put it into learn mode.
Once the device has been found by the hub, it will appear on the screen along with a beep.
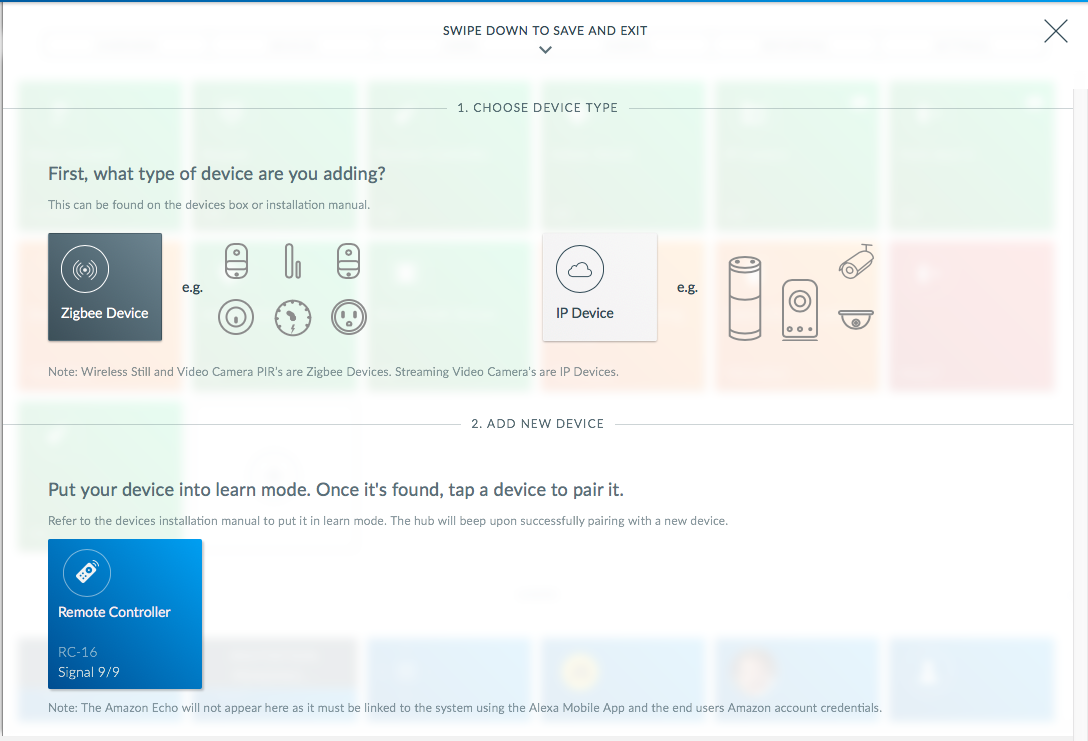
Click on the device (the tile labelled with the device name) to complete the learning process.
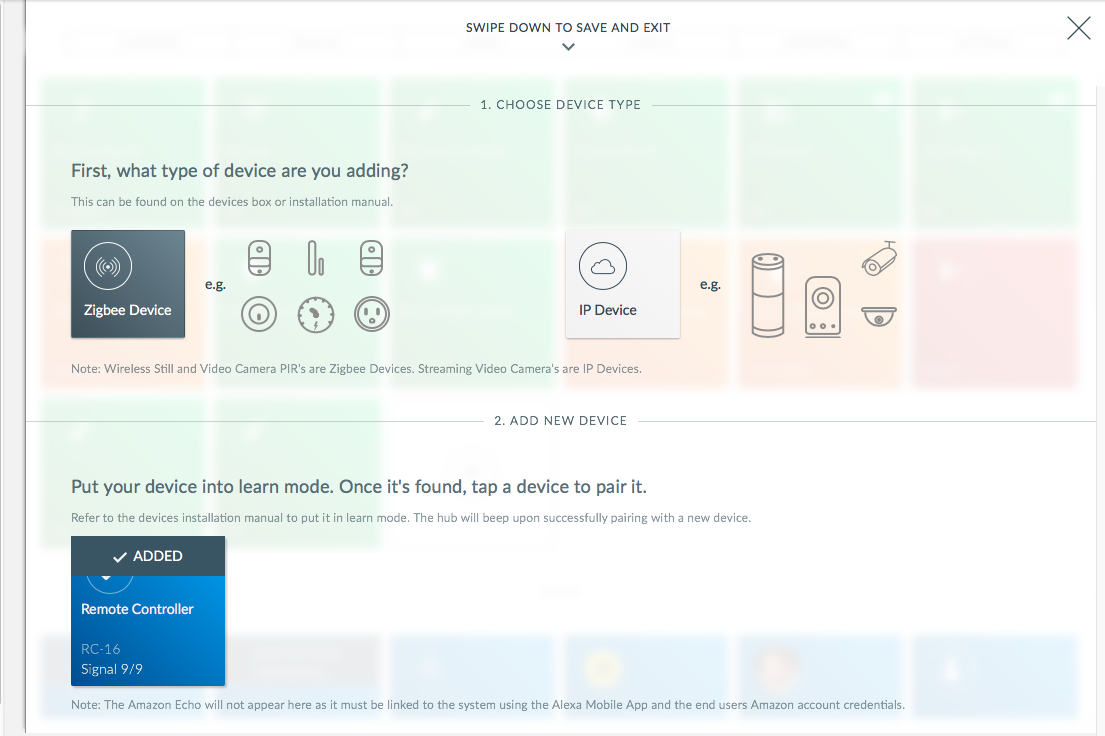
As shown in the image above, the device has been added to the system. Repeat this process for each device.
¶ Configure Reporting
The reporting section will allow us to configure the communication between the hub and monitoring stations.
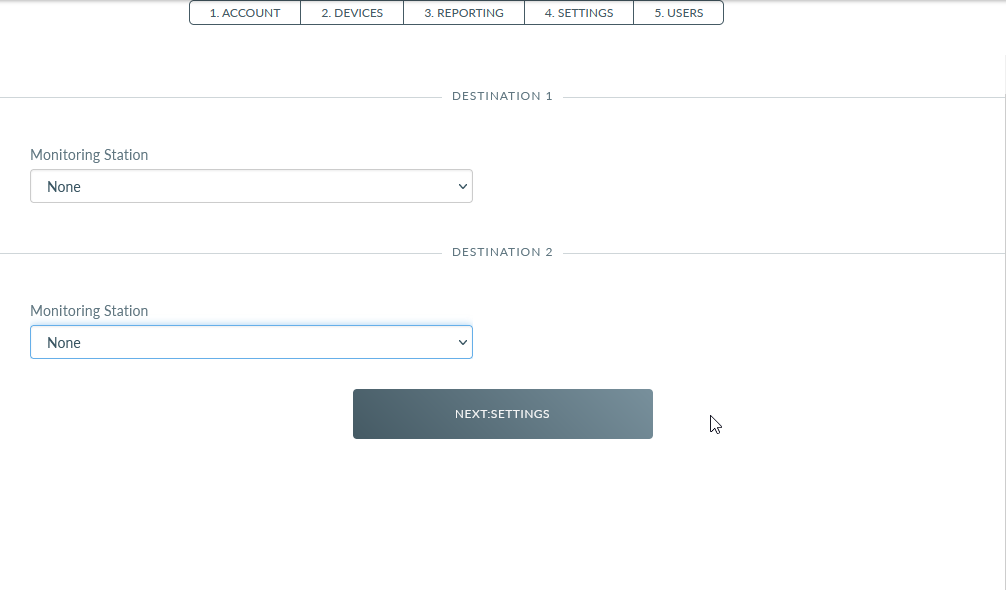
Select the appropriate monitoring station from the drop-down box under Destination 1. If you are using a monitoring station that appears in the list, you will see that most of the fields are prepopulated and you will only need to enter the account code and select the report level from the Report Level drop-down box. Repeat for Destination 2 if required.
If you are using a monitoring station that is not on the list, select Custom. You will need to fill out the relevant fields which will be supplied by the monitoring station. At a minimum, you will need to fill in the fields marked with a *.
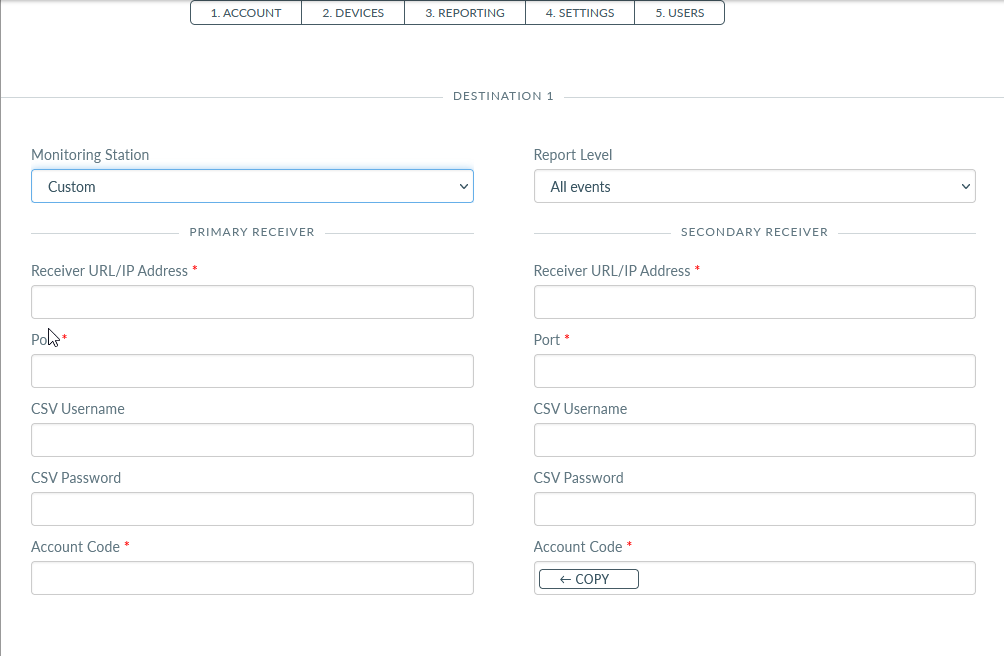
Receiver URL/IP Address - the URL or IP address of the monitoring station. All reporting will be sent to this address.
Port - the port that the monitoring station uses to receive communication from the panel.
CSV Username/Password - this username will show up on each line of received communications from the panel.
Account code - this code is used so that the monitoring station knows which communications are for your account.
¶ Configure the System

From this page, we can set all of the behaviour and functionality we need from the Robin Home system.
Alarm Length - the length of time an alarm will sound when triggered.
Entry Delay 1 Time - the length of time the user has to disarm the system before it goes into alarm.
Entry Delay 2 Time - the length of time the user has to disarm the system before it goes into alarm (this is not the same as entry delay 1 time, although it can be the same length of time).
Exit Delay Time - the length of time a user has to exit the premises after arming the system.
Delay Beep Vol. - the volume of the audible beeps heard when the system is counting down the entry or exit delay.
Force Arm - if enabled it will allow users to arm the panel if there are open zones.
Set Time Automatically? - if set to yes the panel will automatically set the time according to the time on a Network Time Protocol server.
NTP Server - select an NTP server from the drop-down box to set the panel time by.
Timezone - the timezone of the panel.
Day, Month, Year - set these if you want to set the date/time manually.
Hour, Minute, AM/PM - set these if you want to set the date/time manually.
Online/Offline Notifications - set to On to receive notifications about the connection status of the panel. Set too Off if this is not required.
Notification Threshold - the number of online/offline notifications per minute that will be received on a user's phone (with the Robin Home app installed).
¶ Setup Users & Apps
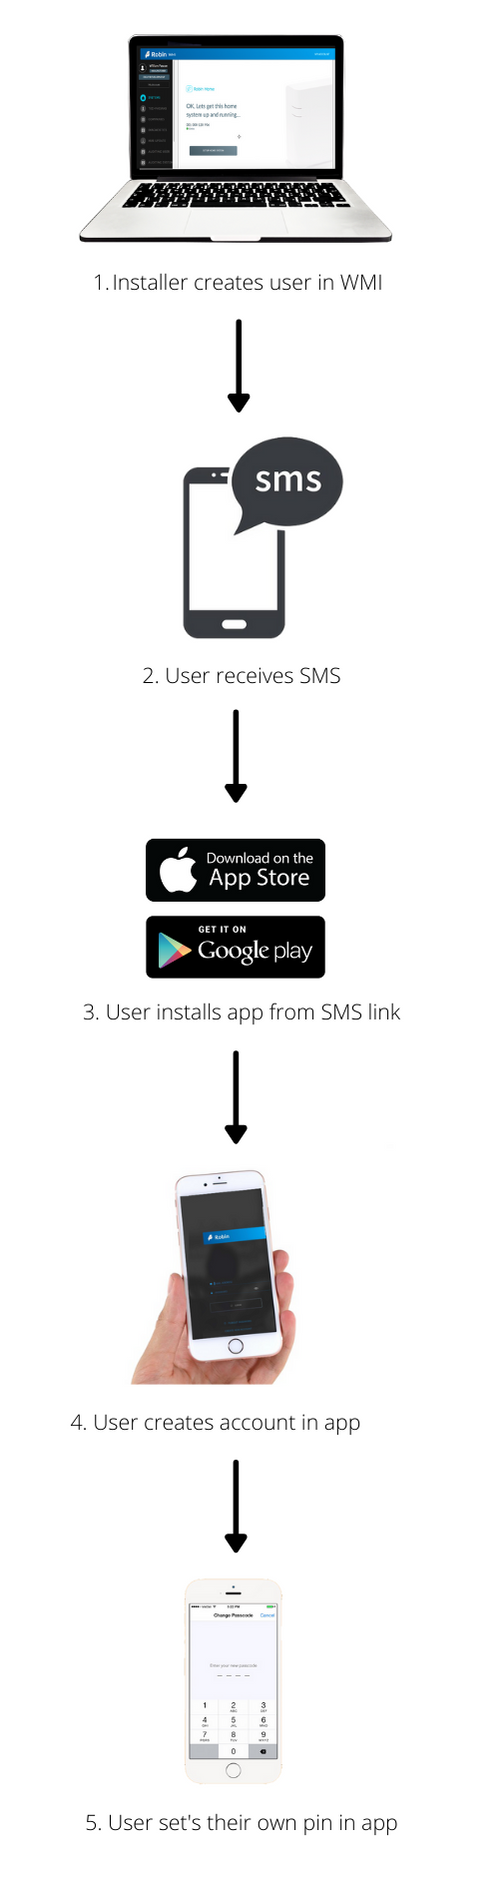
Setting up users and their apps is simple and fast. Follow these 5 steps:
¶ Create Users
The final part of the system configuration is adding users to the system.
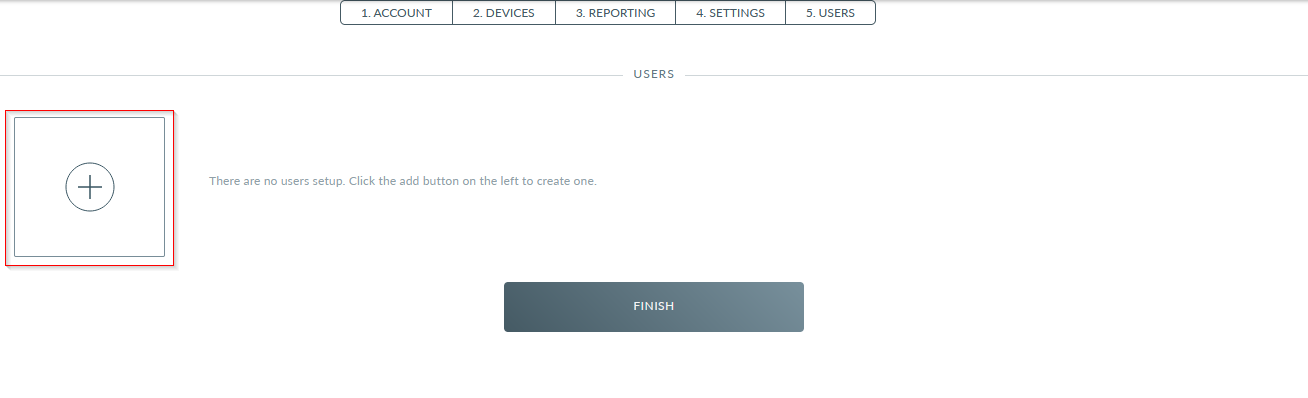
Press the + button to create a user.
Select between a Master and a Standard user. A Master user can add and delete users as well as change pins.
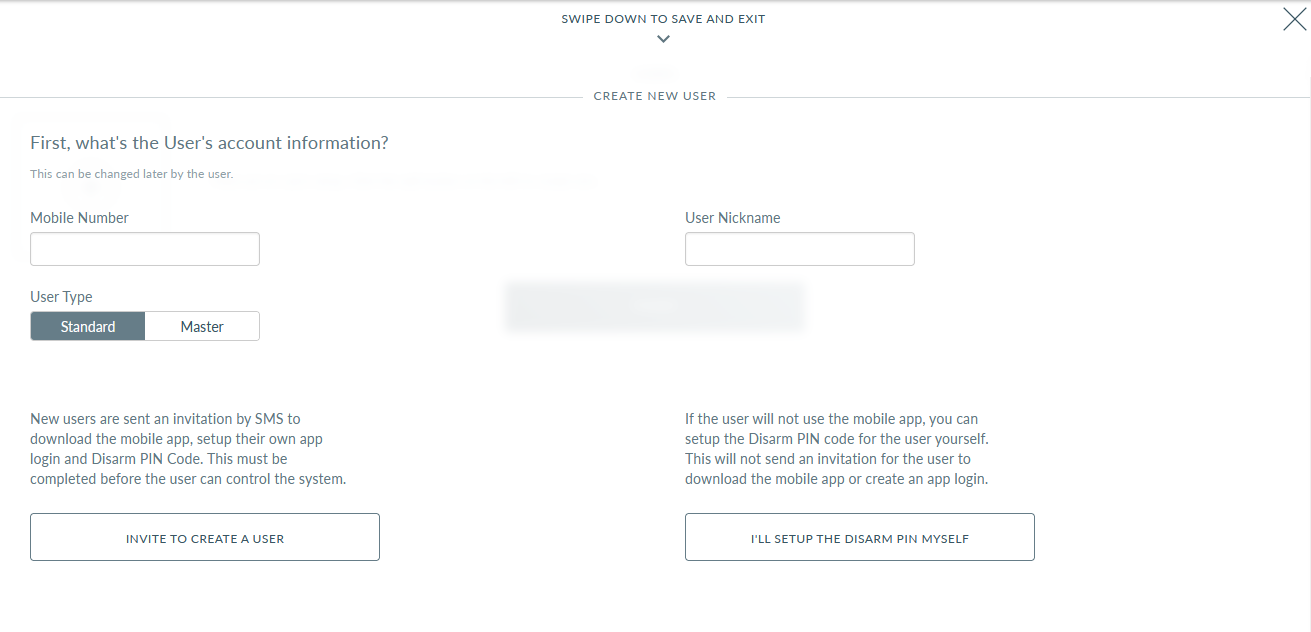
If the user is going to be using the Robin Home mobile app you can simply enter their mobile number and user nickname in the fields supplied, select what user type they will be, then press Invite To Create User. They will be sent an SMS message with a link to download the Robin Home app. The user can then set up their pin and disarm preferences.
If they will not be using the app, click I'll Setup The Disarm Pin Myself button to reveal further input fields.
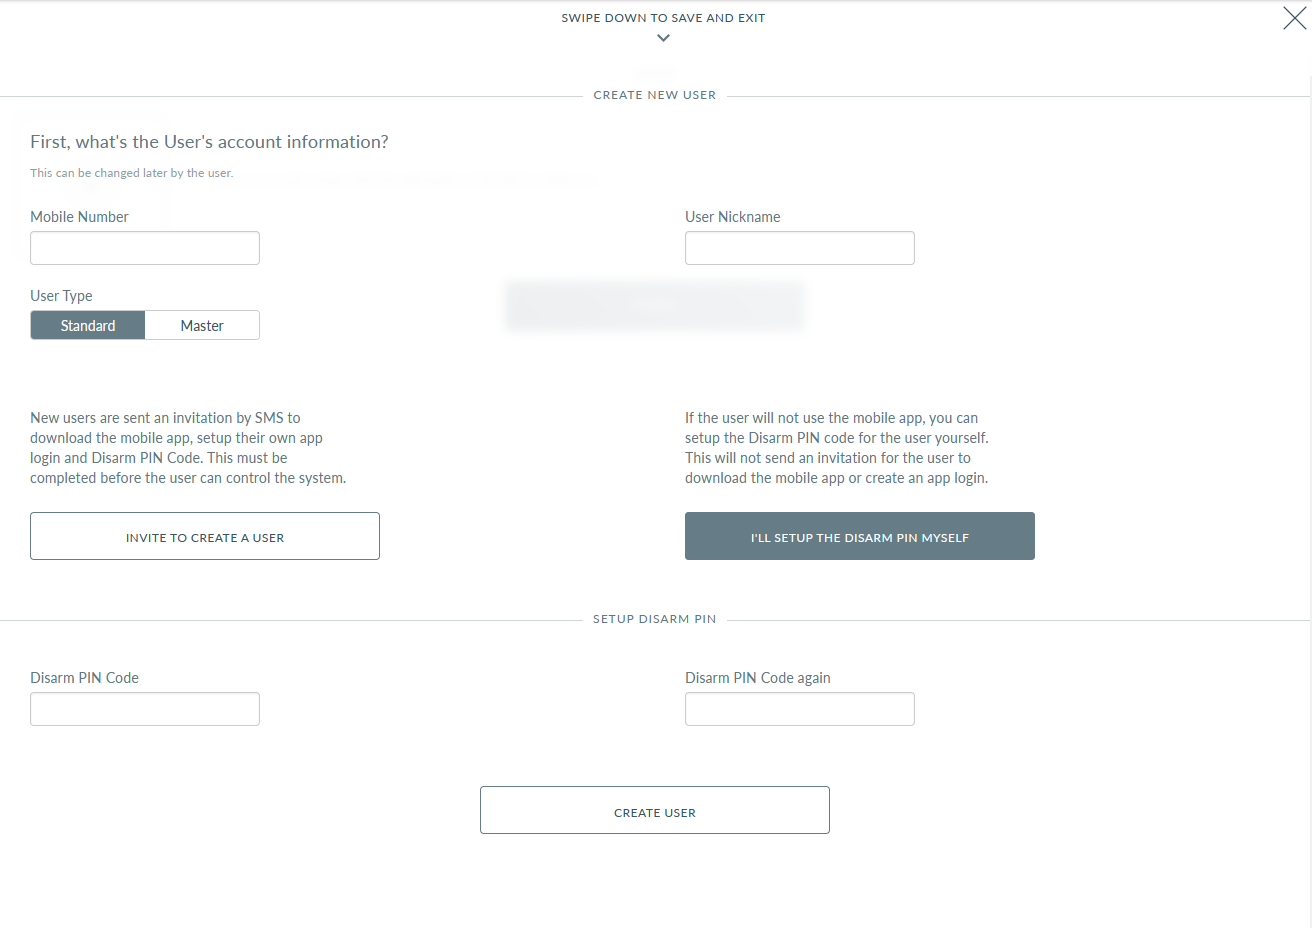
Enter the disarm pin twice, then press Create User. Do this for all the users that will be on the system, then click Swipe Down To Save And Exit.
¶ Installing the App
To install the app onto a user's phone, simply advise them to click the link in the SMS they will have received during the user creation. Alternatively, they can visit one of these links:
For Android users: https://play.google.com/store/apps/details?id=com.eightdevelopment.eas.android
For Apple users: https://apps.apple.com/nz/app/robin-home/id1232096070
¶ User Account
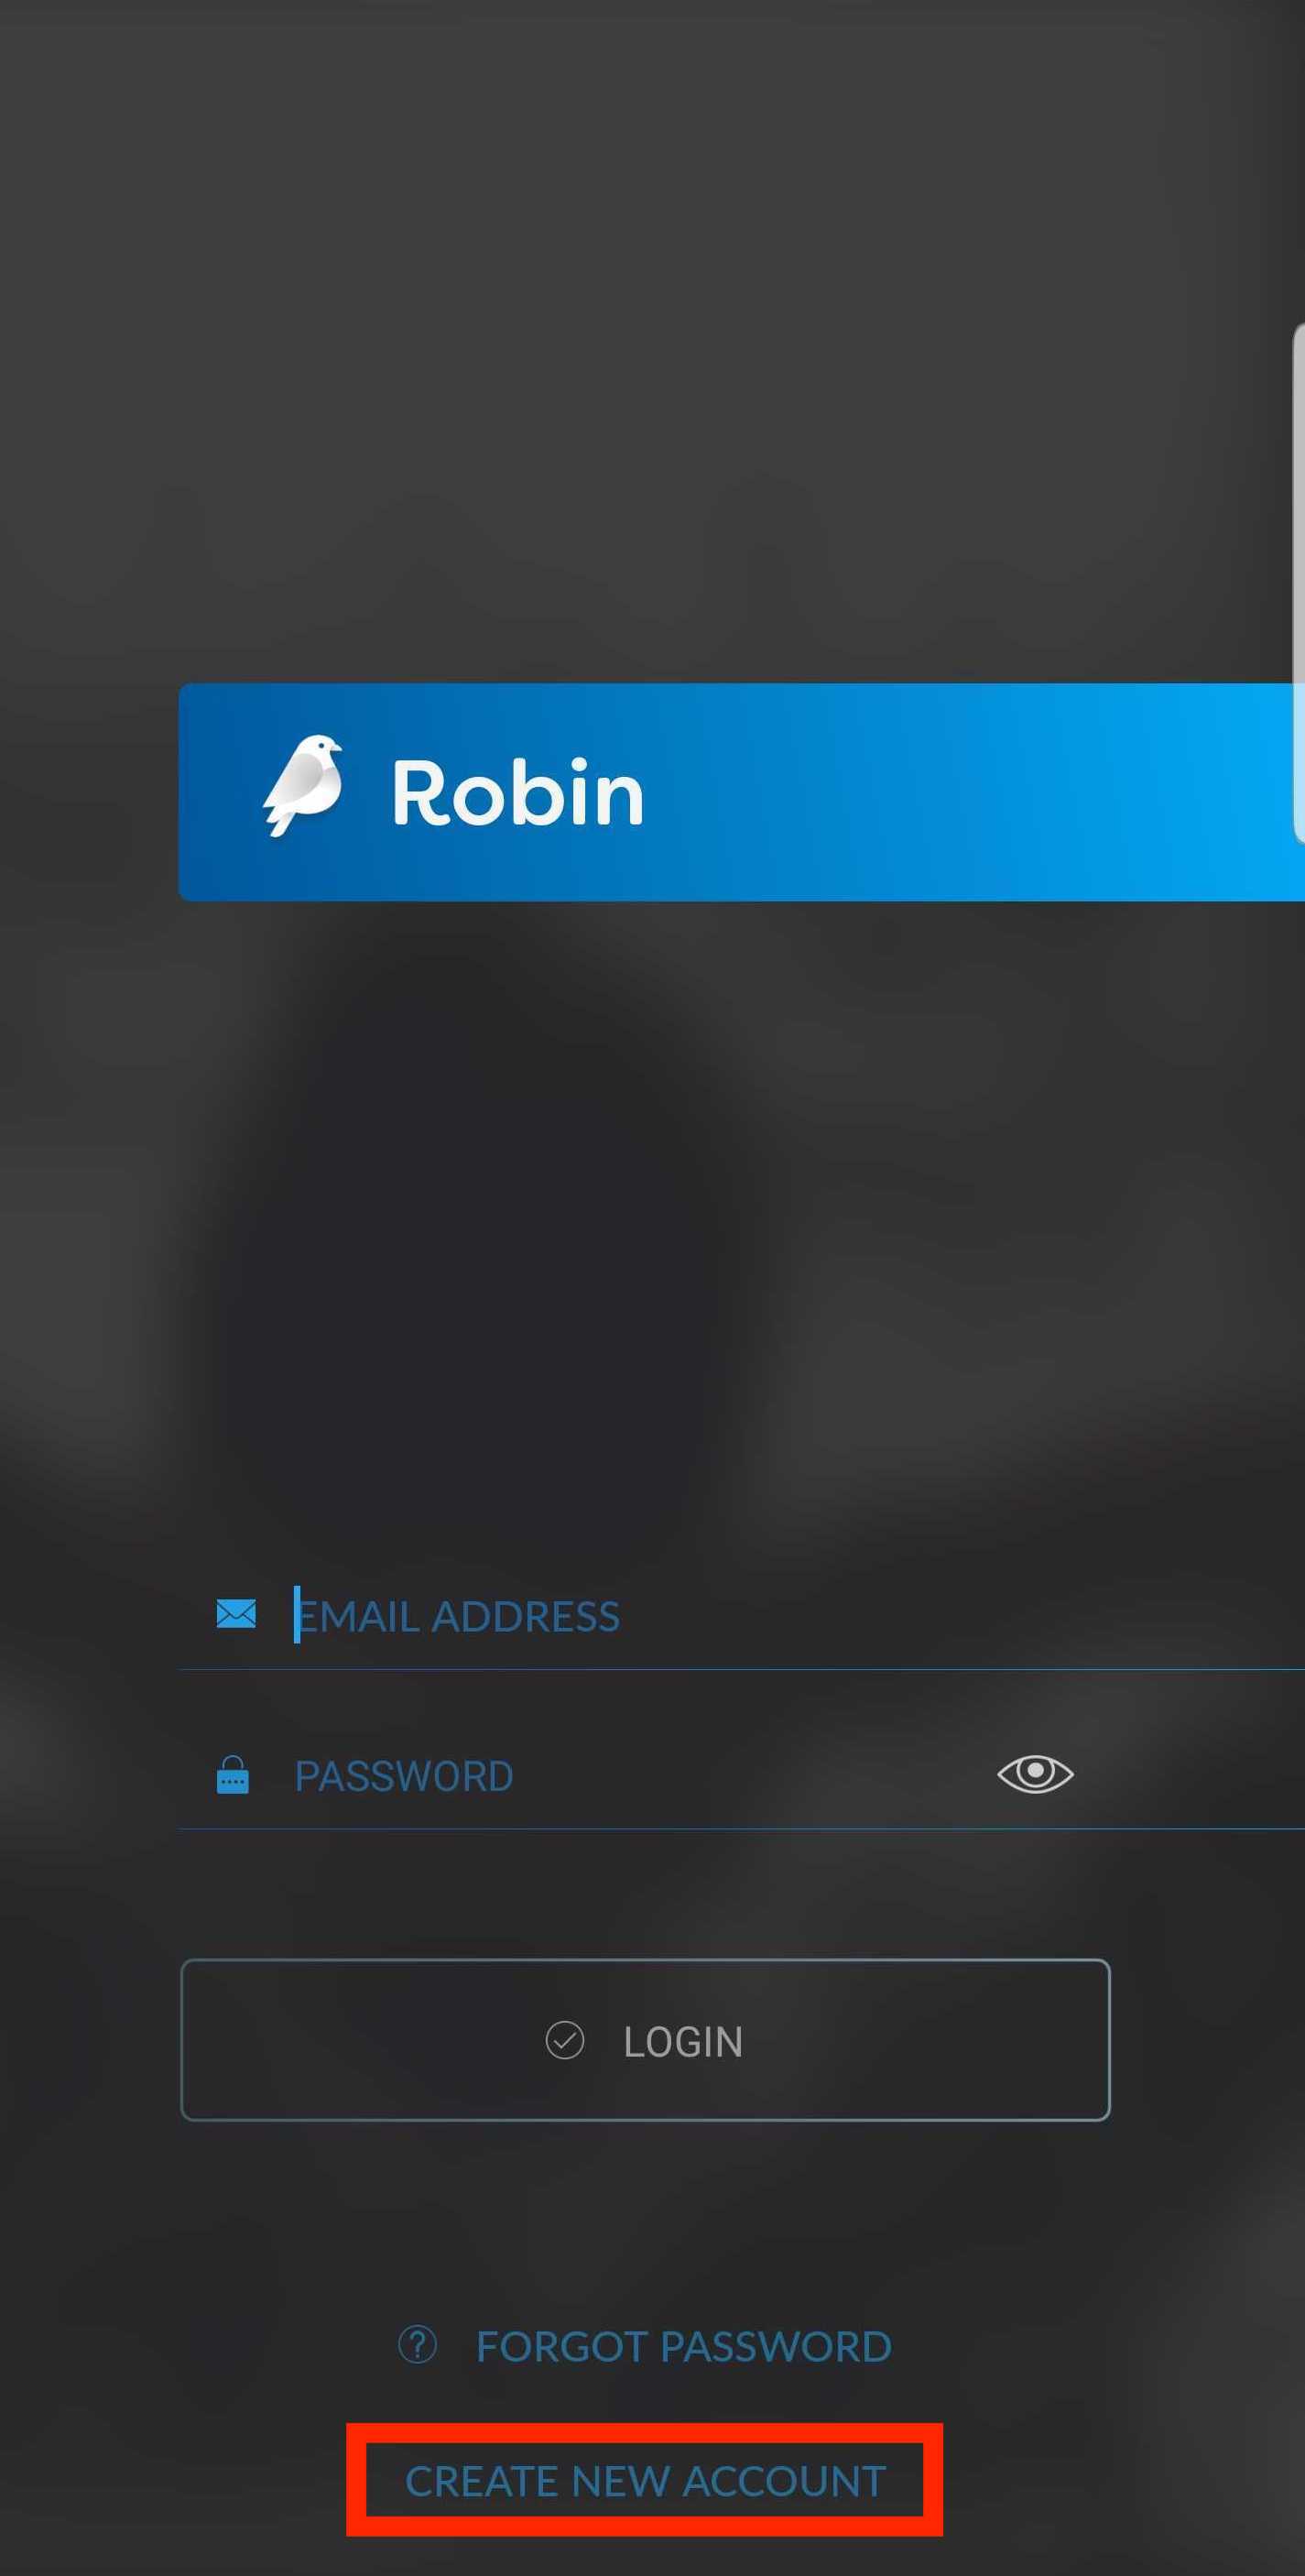
Once the user has installed the app, they can create their account by opening the app and tapping Create New Account.
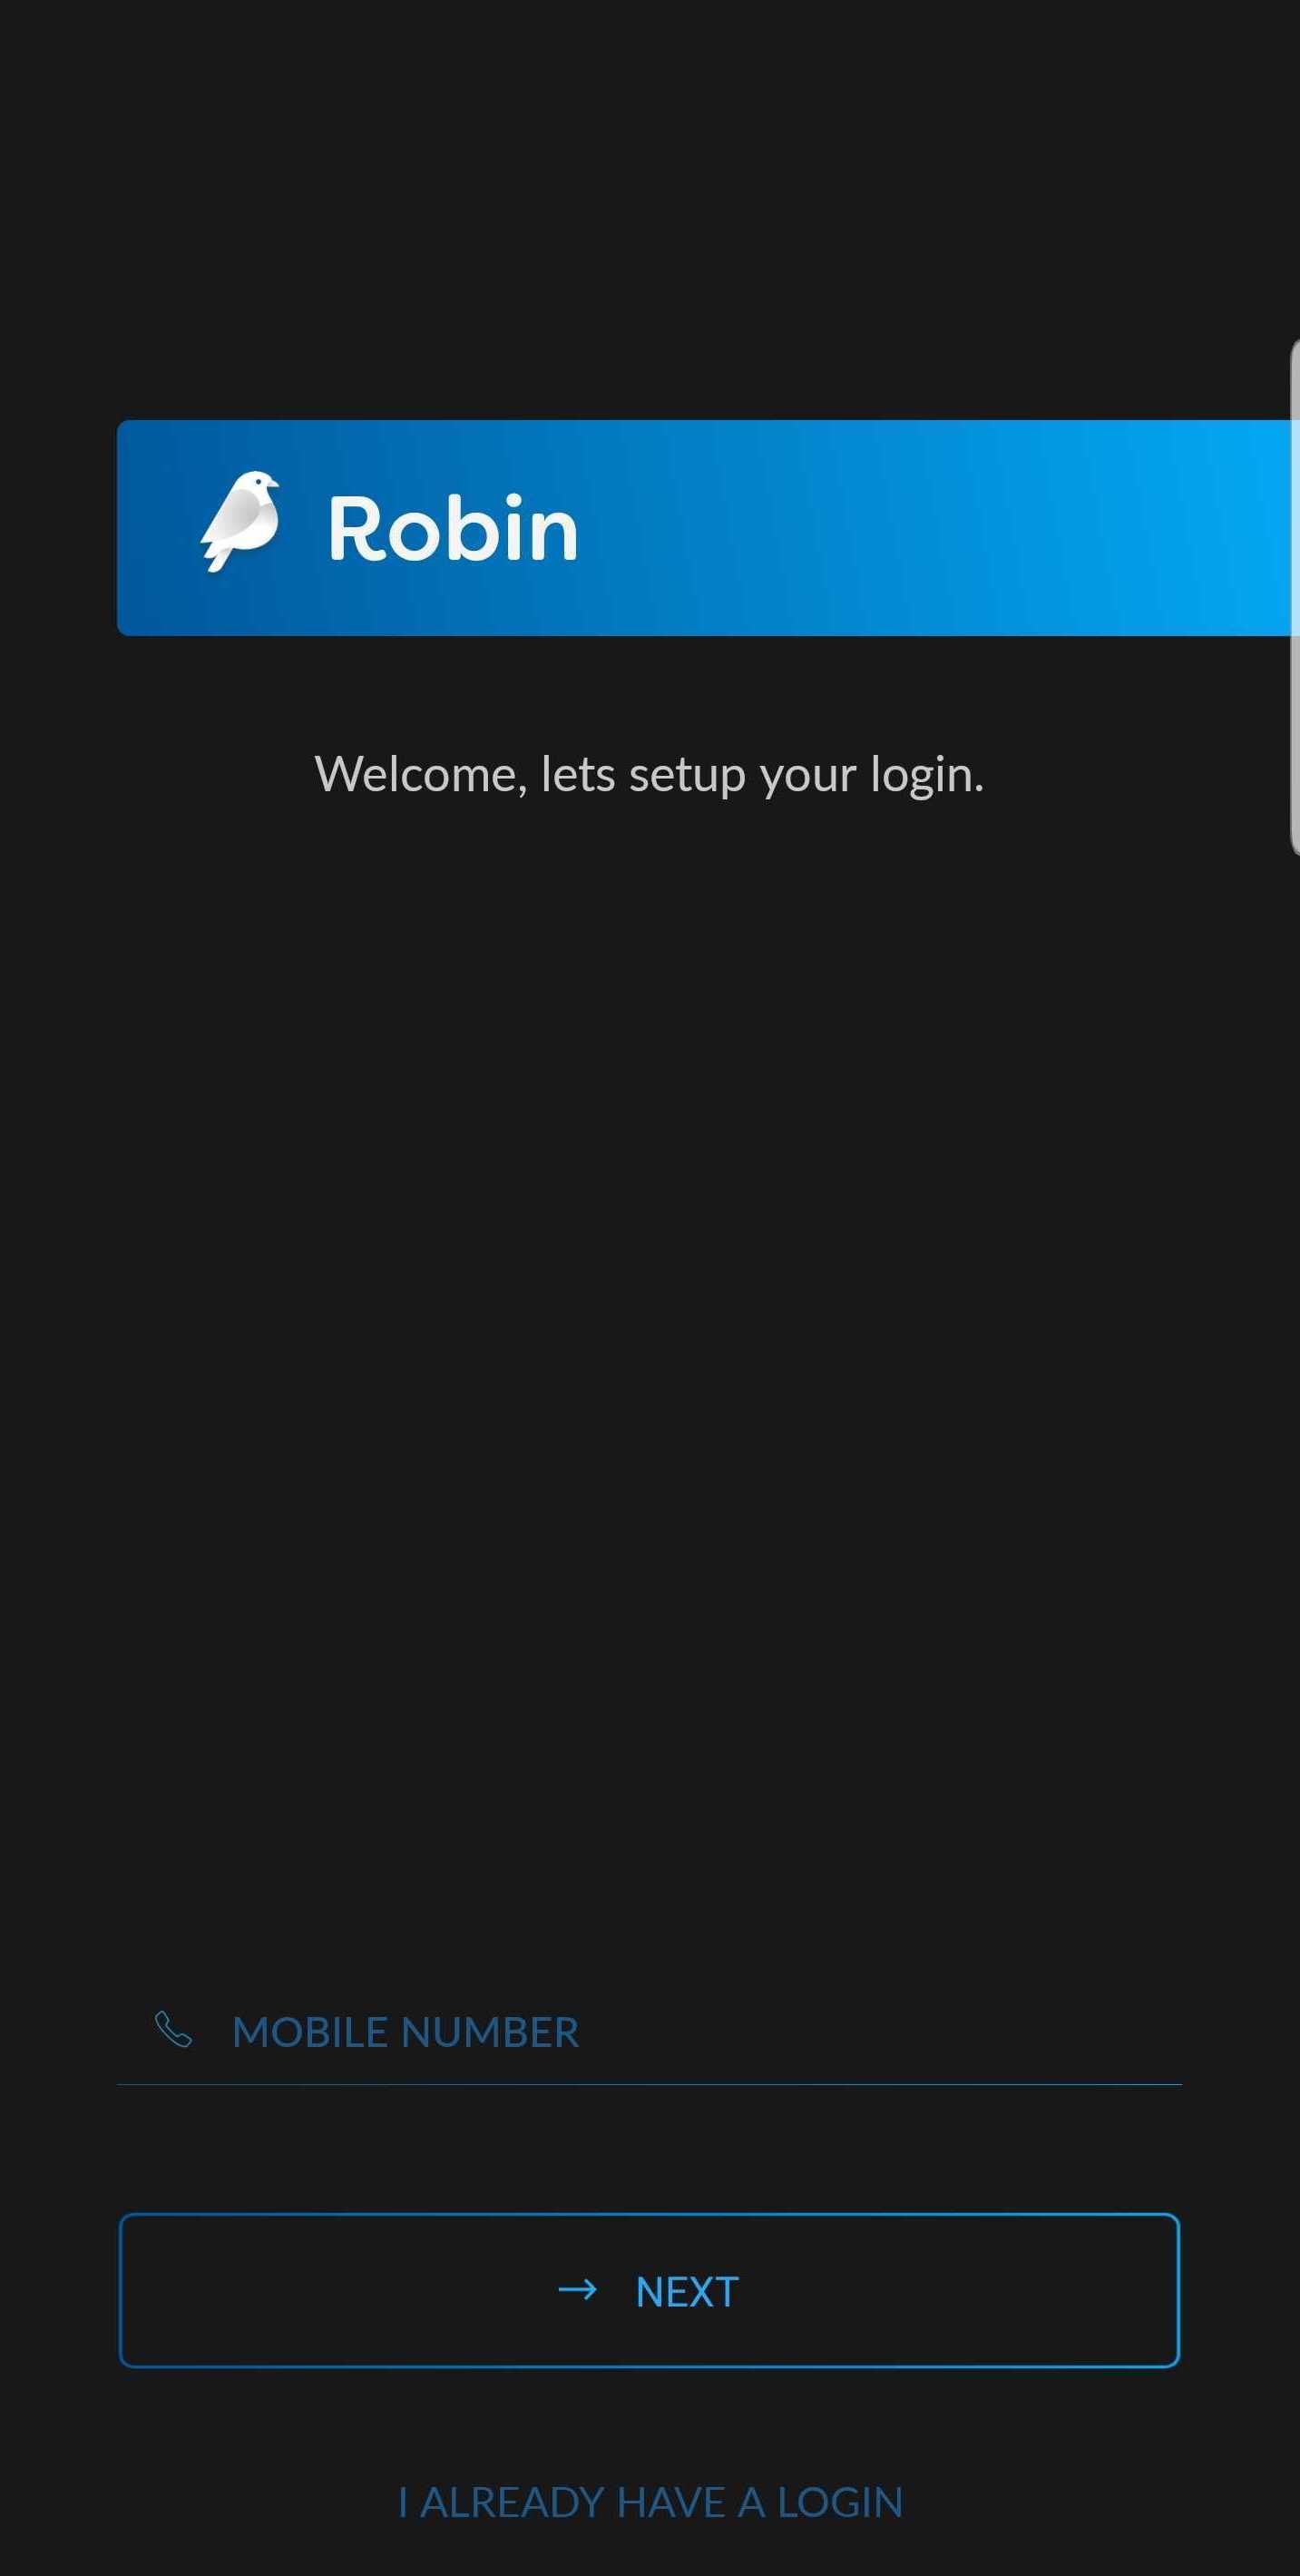
The user can then enter their mobile number to get a verification code.
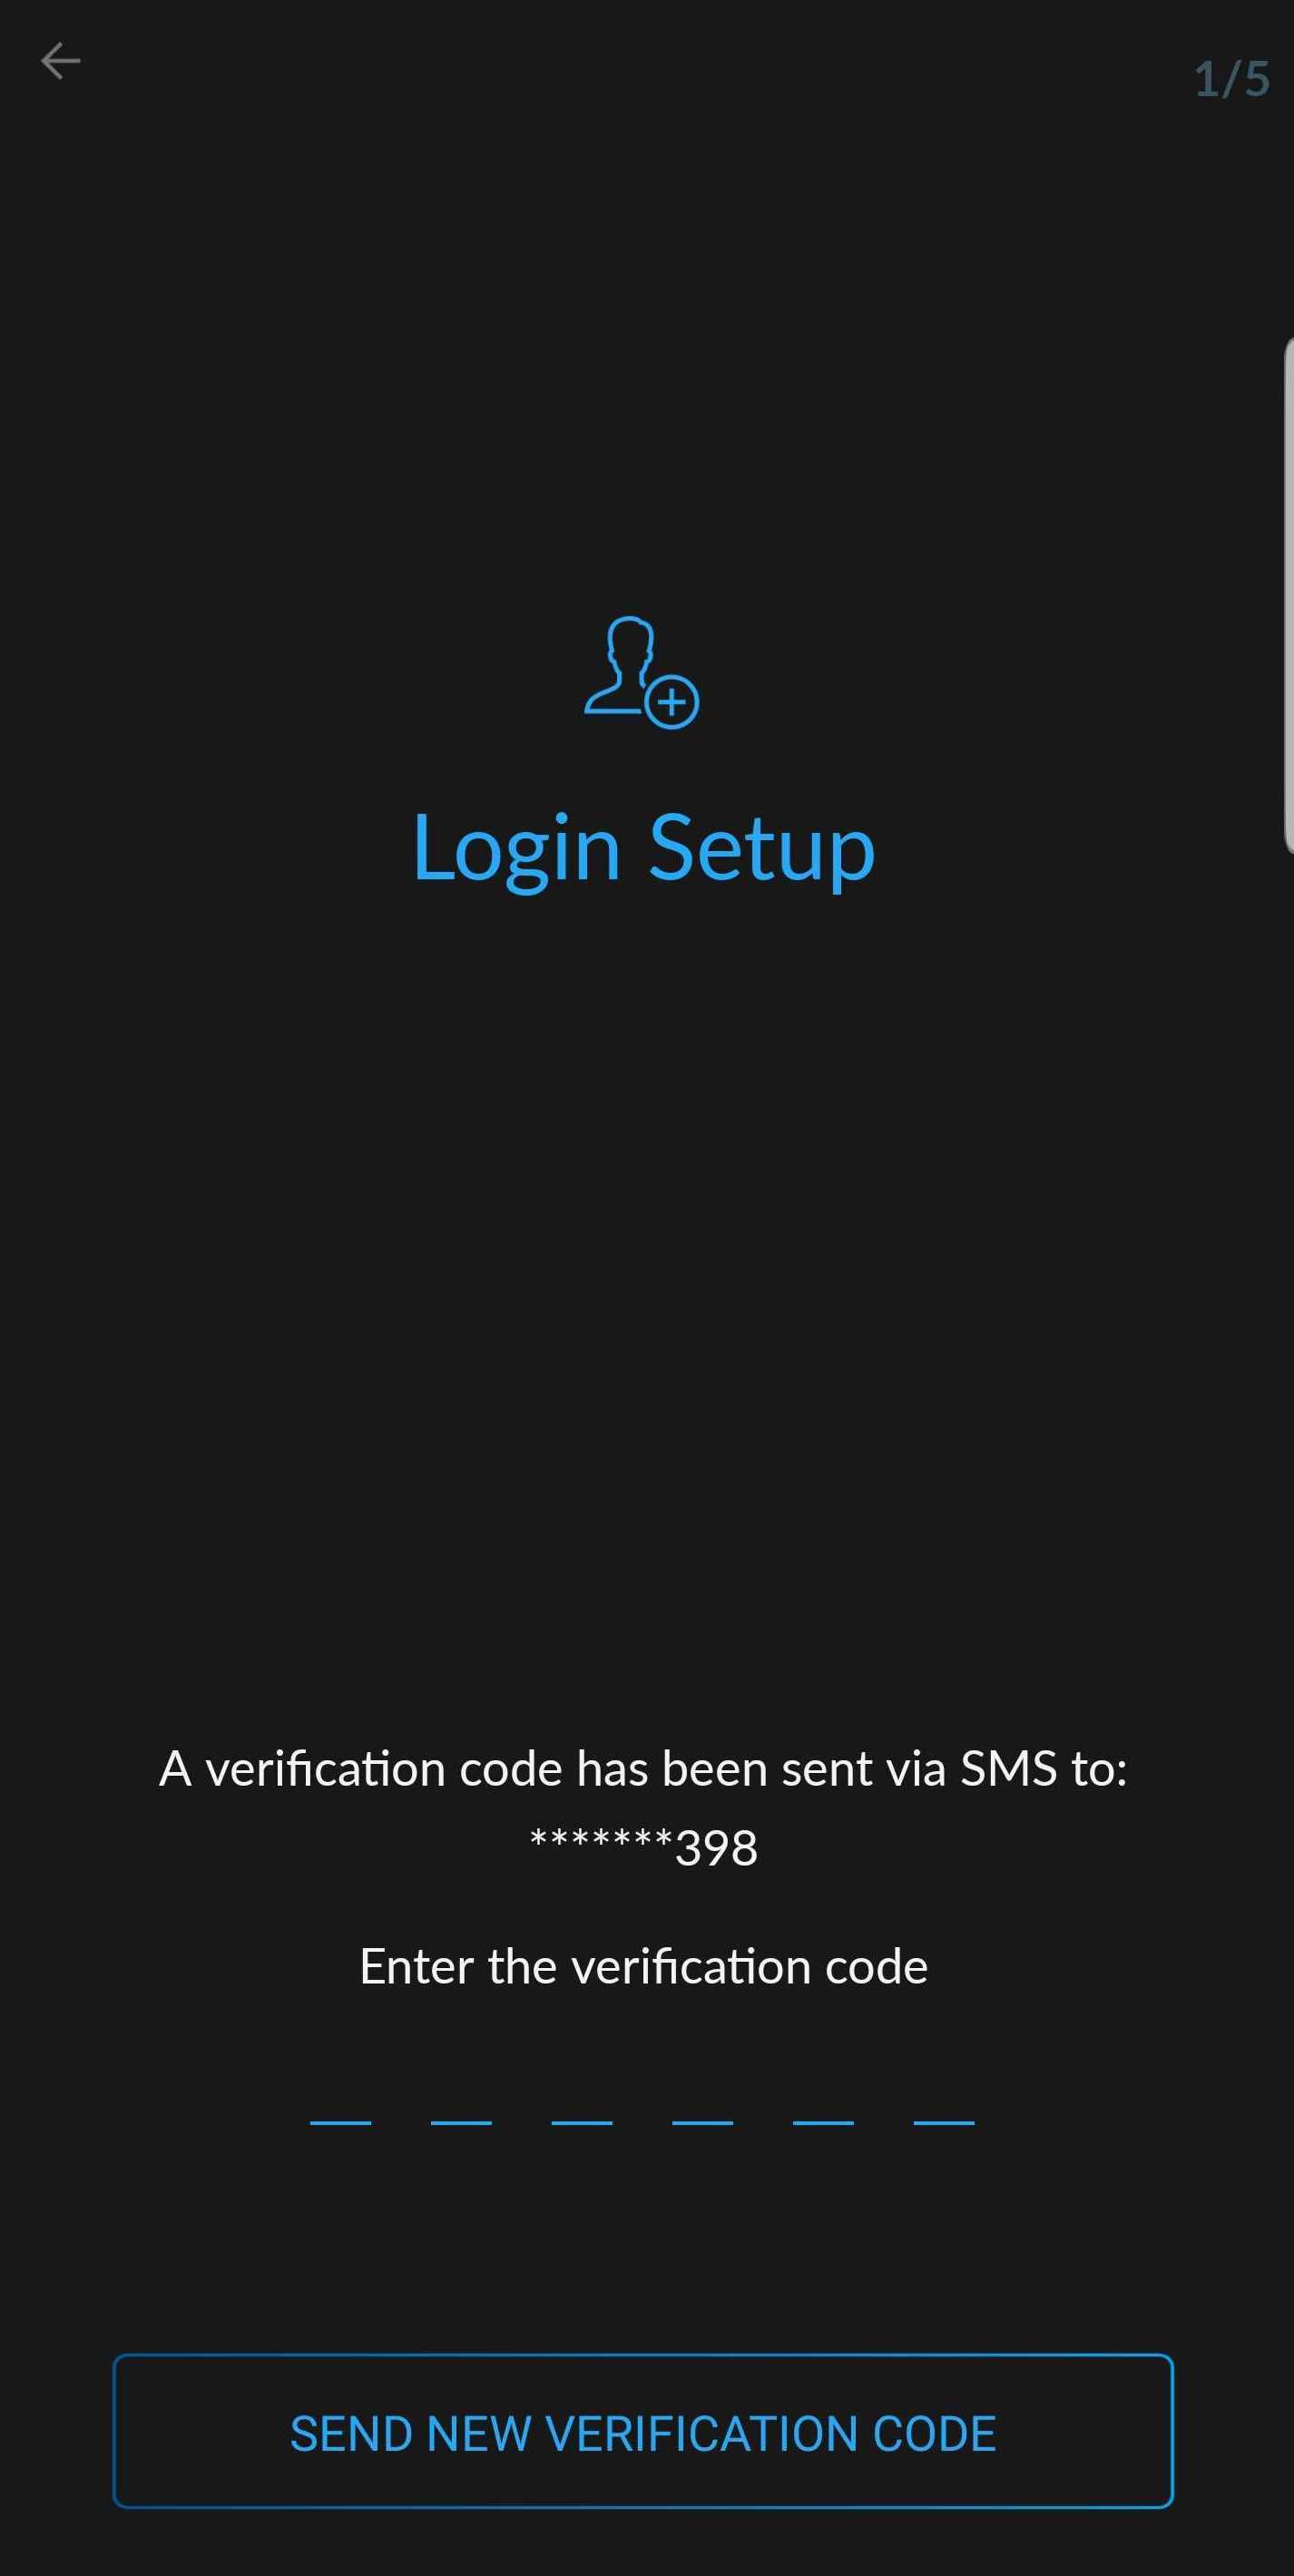
Once they receive an SMS with the verification code, they can proceed and complete their account by following the instructions and selecting their preferences.
It is up to the user to choose their pin and disarm preferences. As an installer you don't need to do anything.
¶ Install Devices
The last step before completing the installation is to physically install the paired devices. When selecting locations to mount the devices take into consideration all of the things you would with any other security system, e.g. avoiding direct sunlight for sensors.
Refer to the device manual for full installation instructions. All mounting hardware is included in the packaging for the specific device.